
In the previous article, we designed a login screen that makes an API request. However, we don’t have a server that will handle this request yet. API calls are an important part of every mobile app that communicates with a remote database, which is most apps today, so it goes without saying that we must add this feature to our SwiftUI app.
Of course, to do this, we have to use an API. One way to do this is to connect to one of the publicly available APIs, which is completely viable for learners. However, using these APIs comes with some drawbacks:
For all these reasons, we will not use a public API. Instead, we will make our own! But no worries, you will not be forced to set up a Node.js server on your machine! 😅
We will do something much simpler instead. We are going to set up a mock server in Postman! This way, we can precisely define what our requests will be and hardcode the responses so the requests return exactly what we want them to. Of course, we will hardcode all of the server data, and there will not be much “real” logic, but in return, we will get an excellent set of mock requests and responses to use in our app.
Open Postman and click on the Mock Servers button on the left side of your workspace.
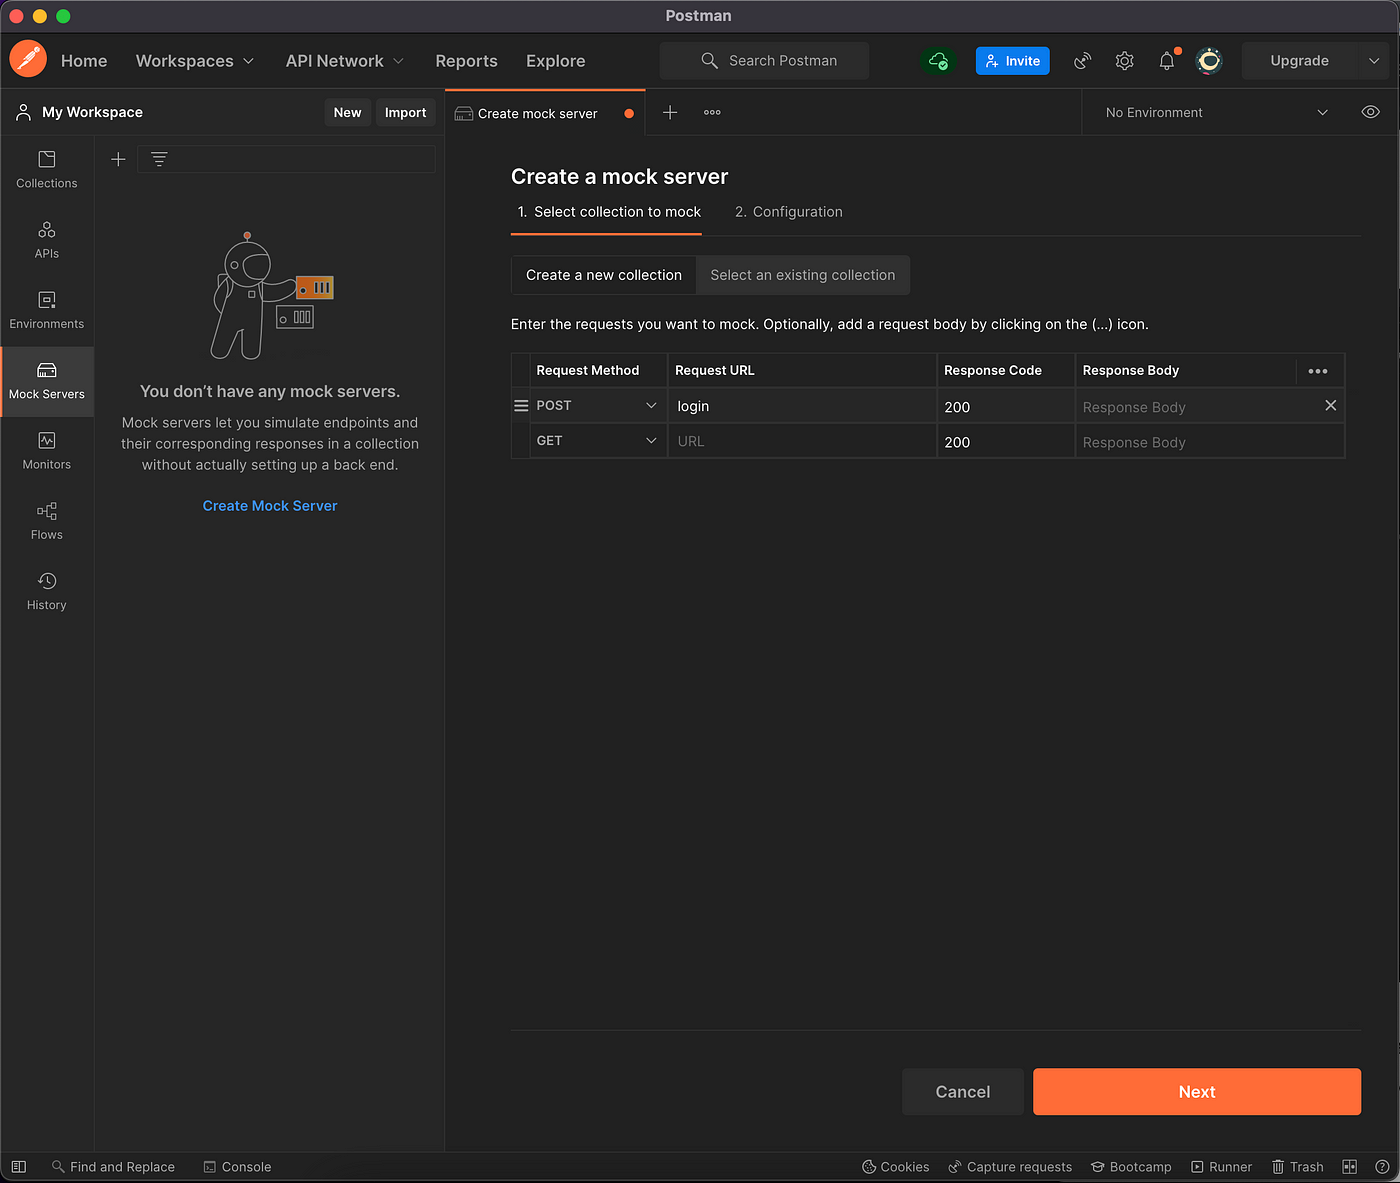
Next, click on the Create Mock Server button to start the server creation process. Leave the collection tab on Create a new collection, and change the first Request Method to POST. Our first request will be to log in, so let’s just enter login in the Request URL field. We don’t need to do anything more in this step, so let’s proceed by clicking Next.
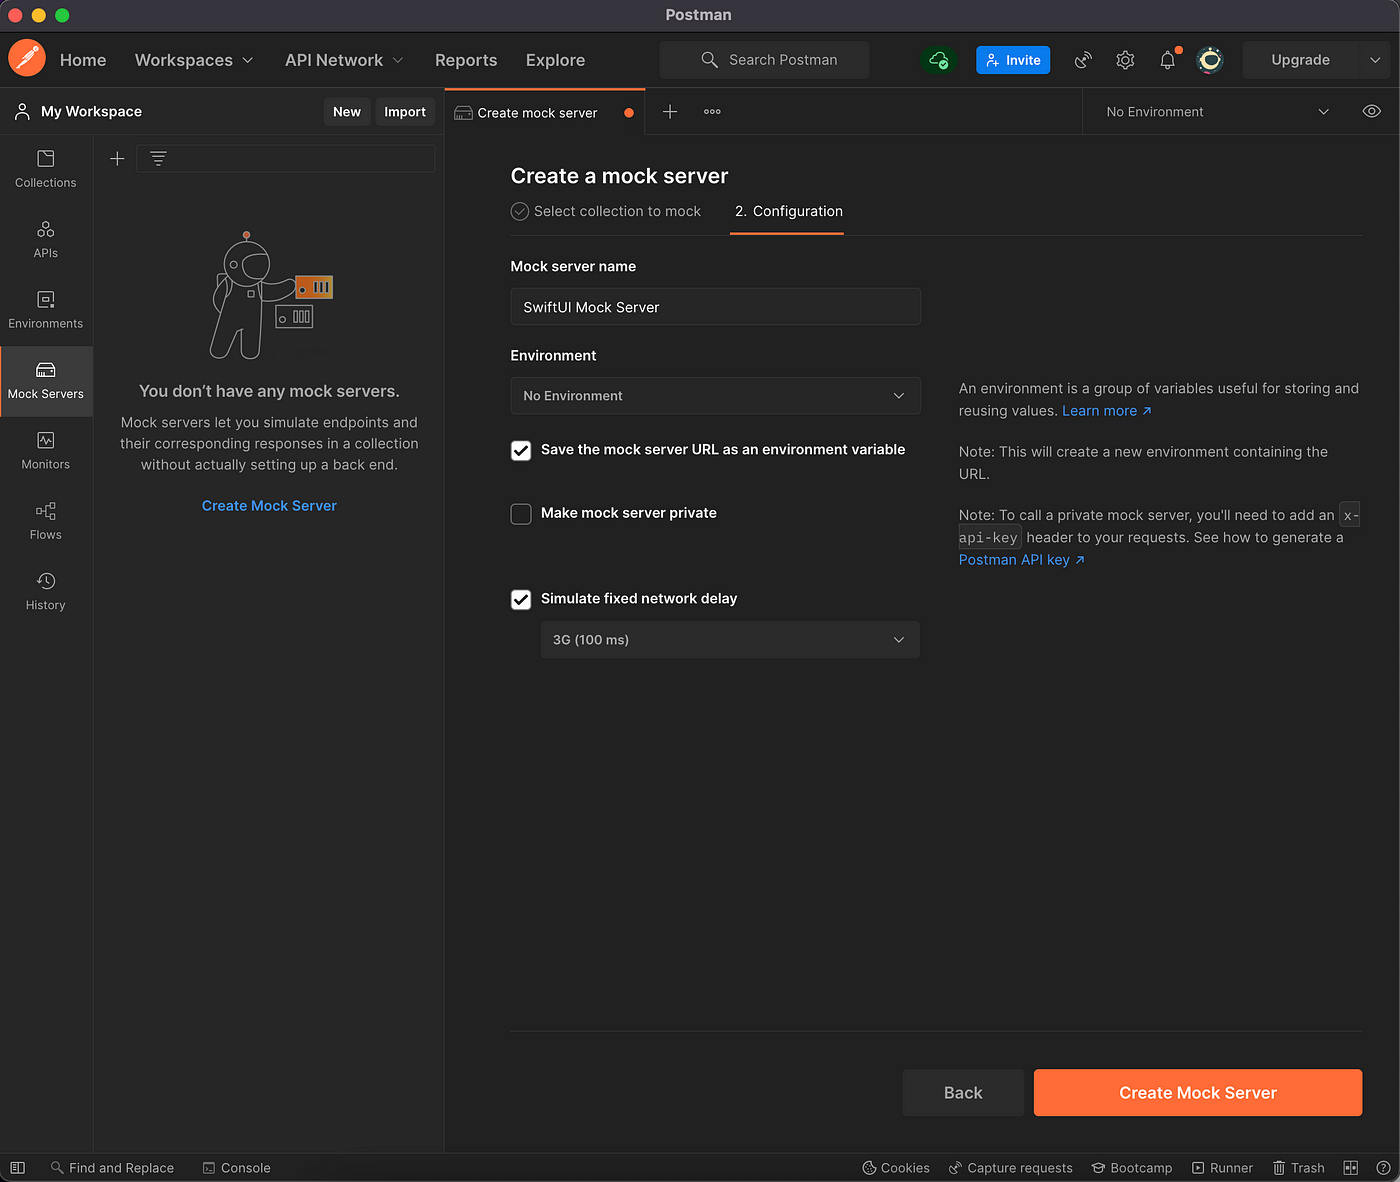
On the next screen, enter the Mock server name (in my case, it is called SwiftUI Mock Server), and check the Simulate fixed network delay checkbox to make our server a little more realistic. Leave everything else as it is and click on the Create Mock Server button.
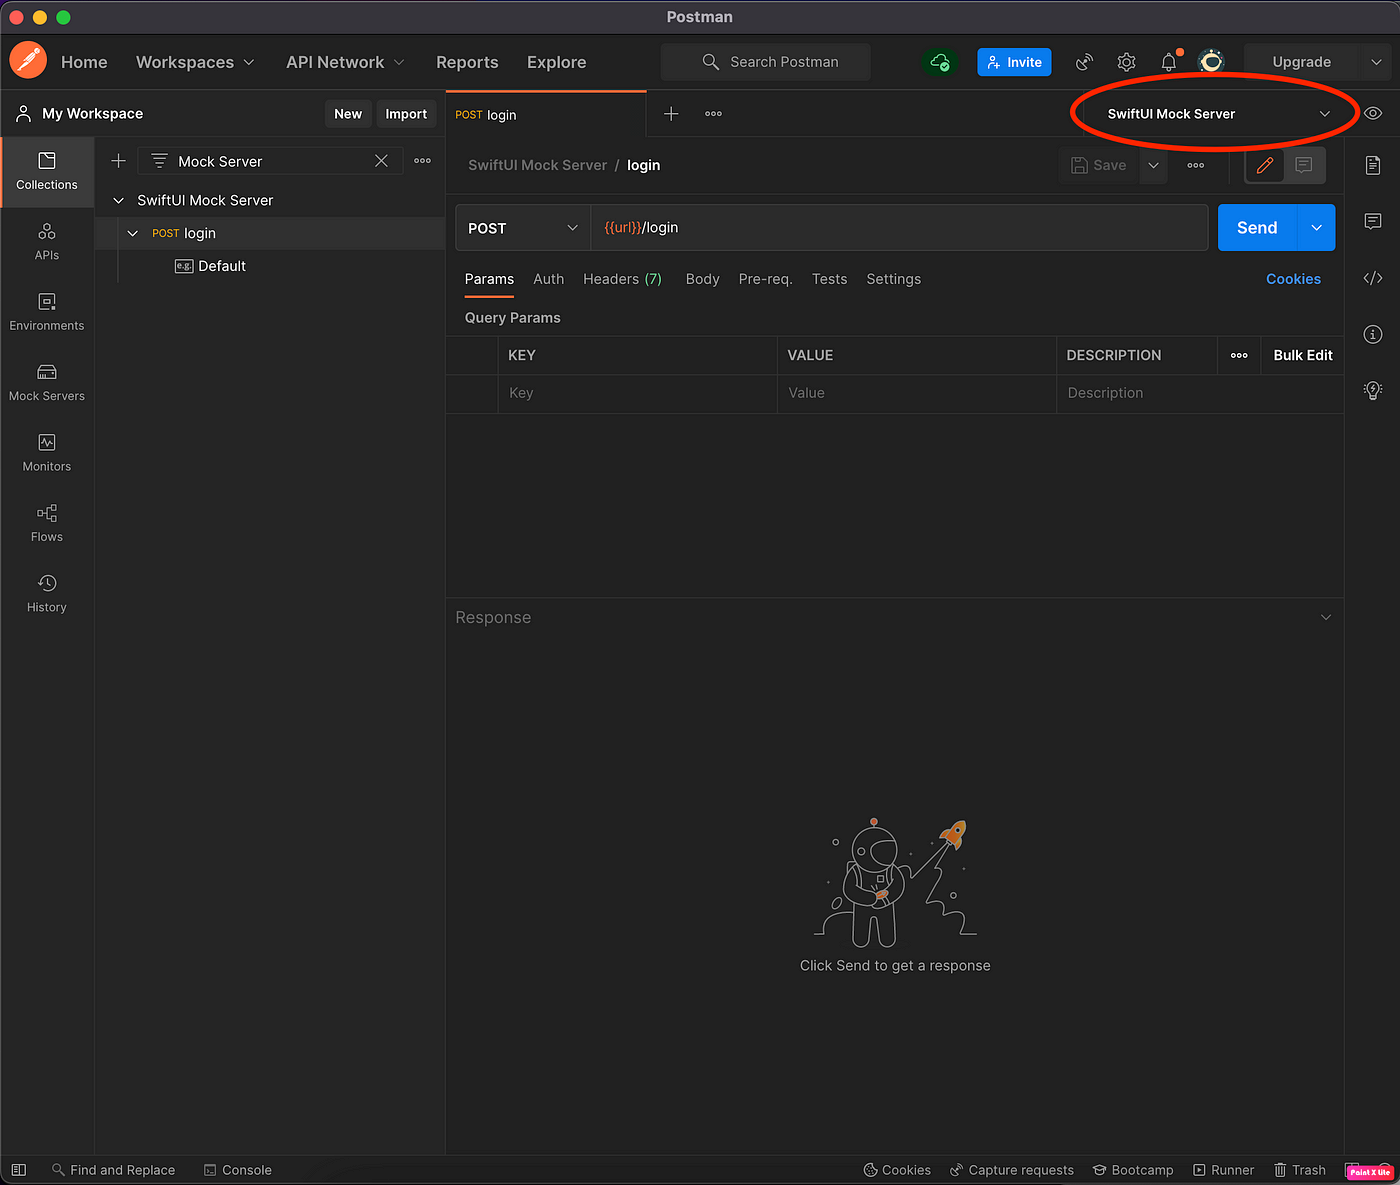
We have just created our brand new mock server! Let’s check our Collections tab, because a collection should have been created there.
IMPORTANT: Creating the mock server automatically creates an environment for it. The environment will be named the same as the mock server, so in my case, it is called SwiftUI Mock Server. This environment will store the ugly base URL (the URL will look something like https://72a29288-615d-4ed4-8f9a-21b224056d7f.mock.pstmn.io) in the url variable. So, in order to actually use your new mock server, be sure to choose the correct environment in the top right corner!
Let’s roll up our sleeves now because it is time to create some mock requests. In Postman, these mock requests are called Examples. If you want to learn how all of this works in detail, there’s no better place to look than the Postman documentation, as it is full of examples and screenshots. But here, we will just do a quick crash course.
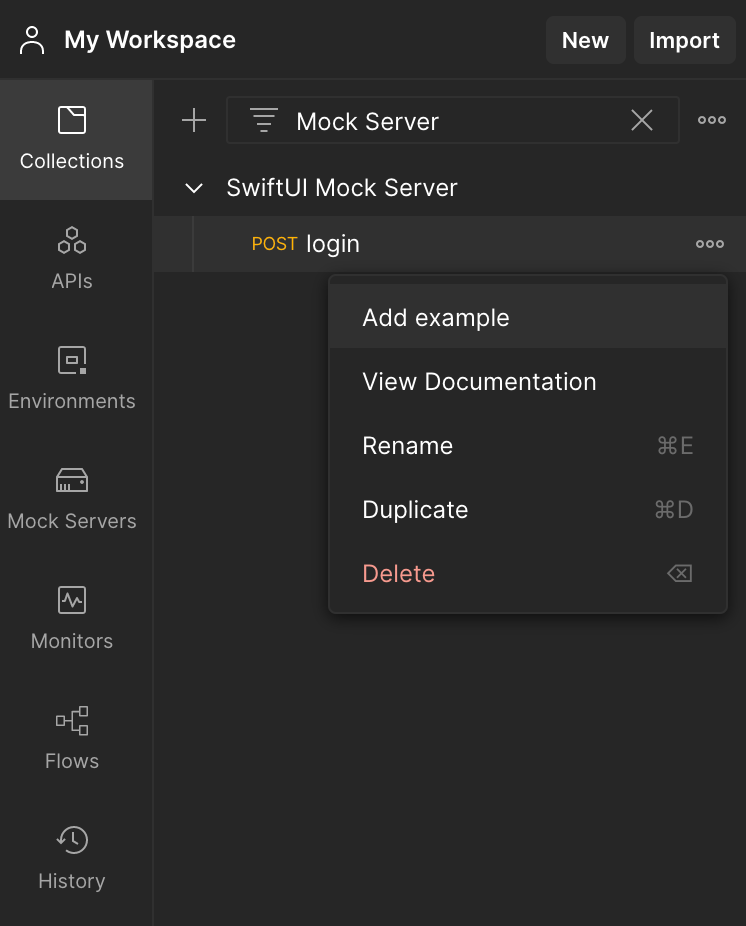
Before we start, you can delete the Default example under our login request, so we have a clean slate.
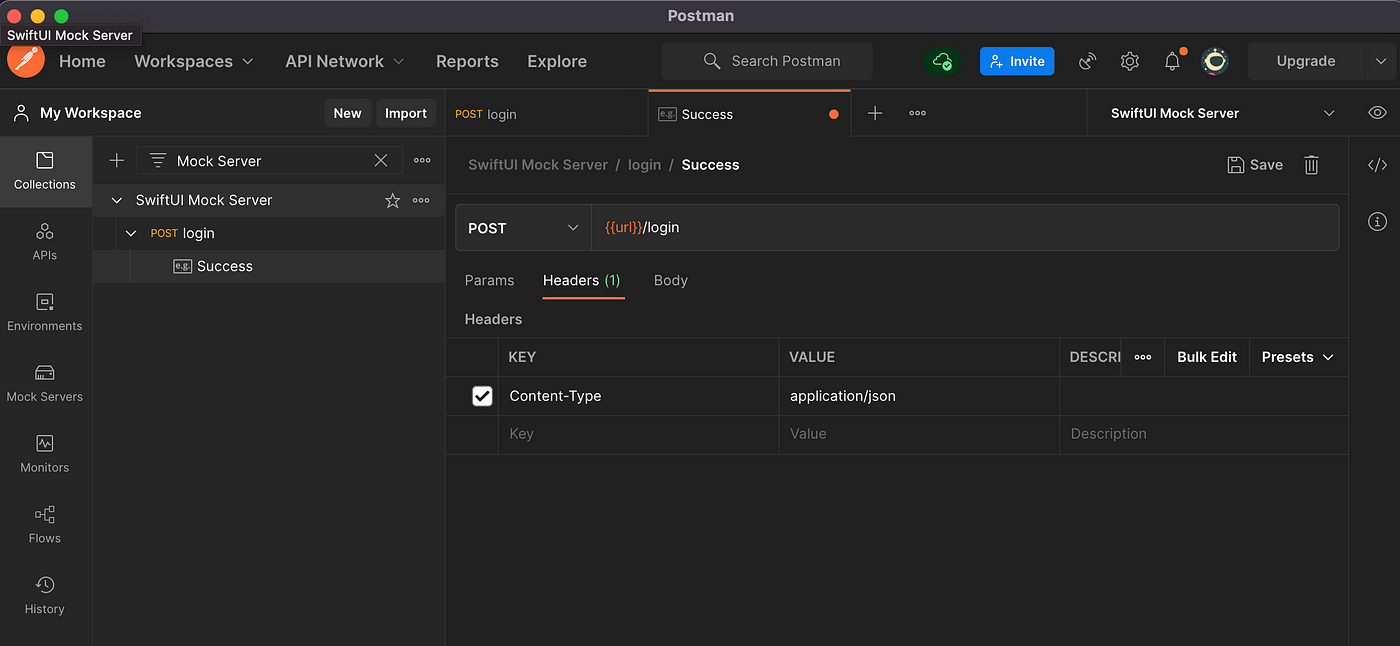
Now let’s make a mock request and response for our success case. Click on the three dots on the right side of our login request and choose Add example.
Let’s name this example Success, as it will simulate a successful login case.
Next, switch to the Headers tab and add a header Content-Typewith the value application/json. Do not forget this step, or the mock examples will not work properly!
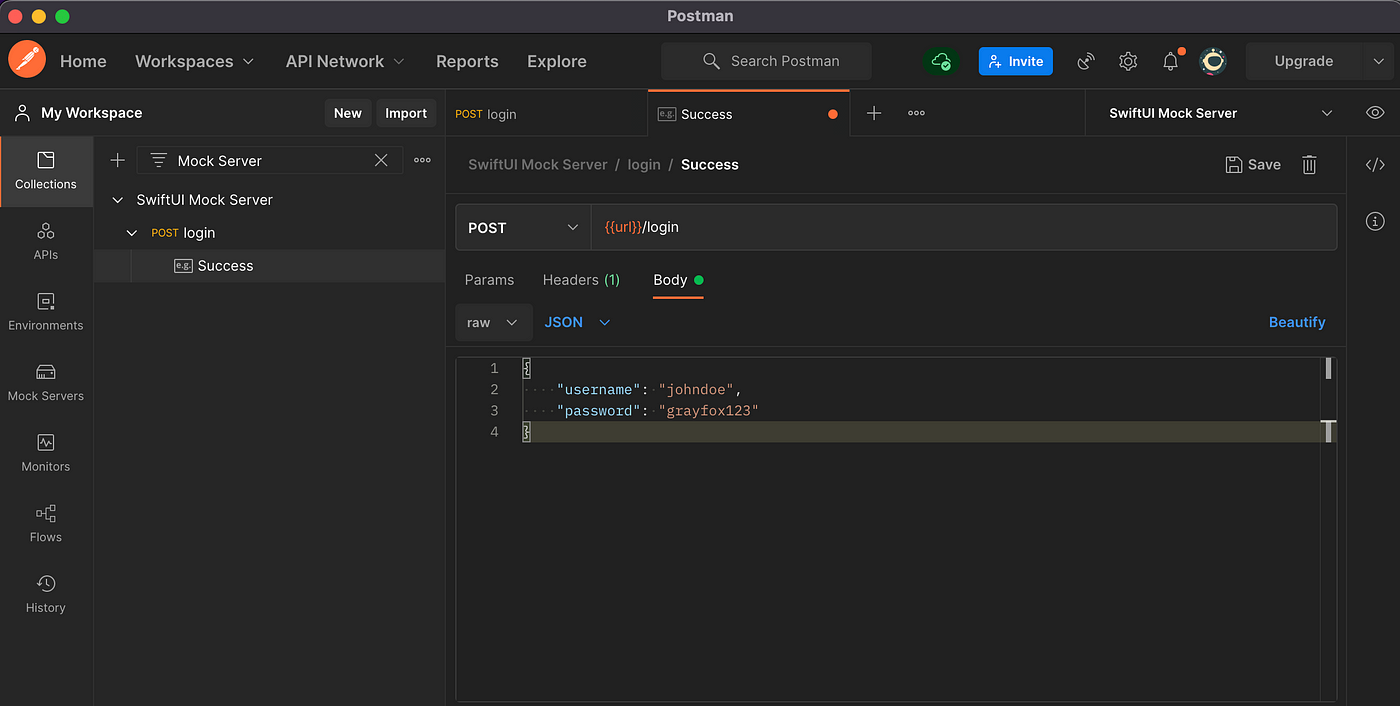
Now switch to the Body tab, switch the type from Text to JSON in the picker, and enter the request body payload that you want to result in a successful response. The payload needs to contain a username and a password. You can use any values you want, but if you want to follow the article, use this example:
{
    "username": "johndoe",
    "password": "grayfox123"
}
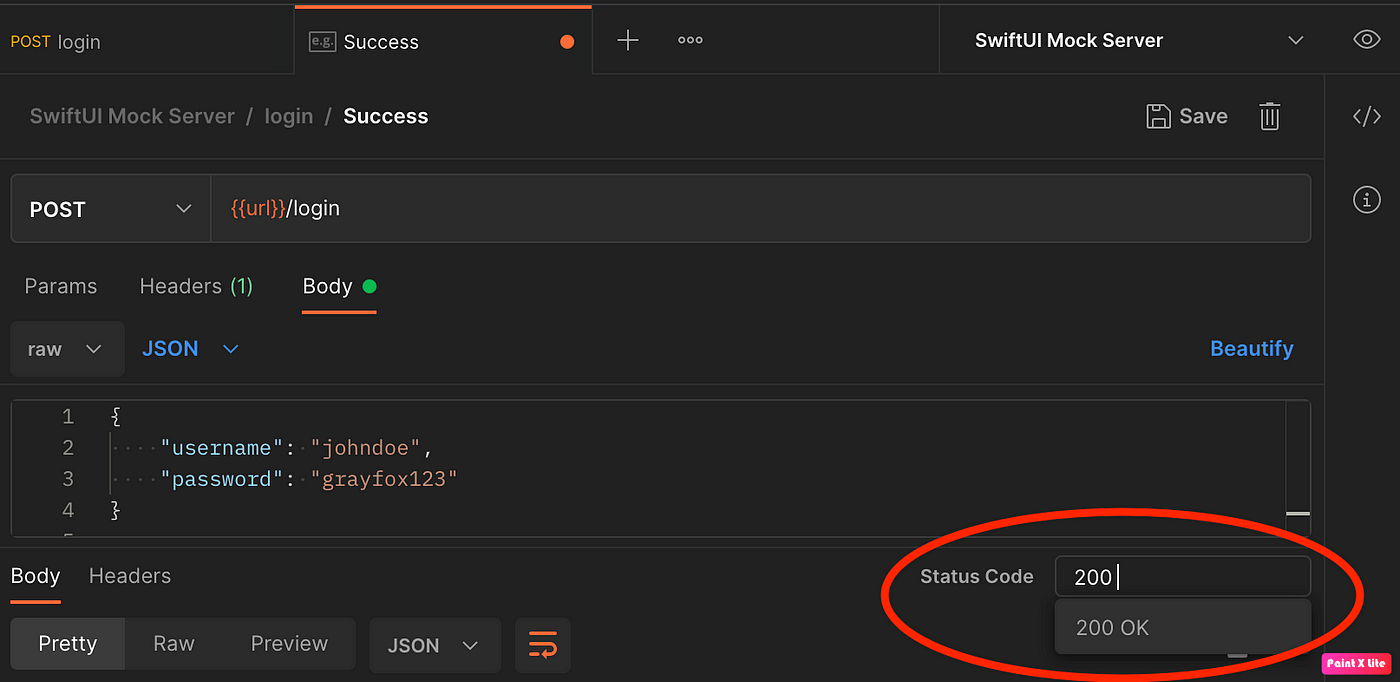
We’re done with our request! Now let’s define our response. First, as this response indicates success, we will enter 200 in the Status Code field.
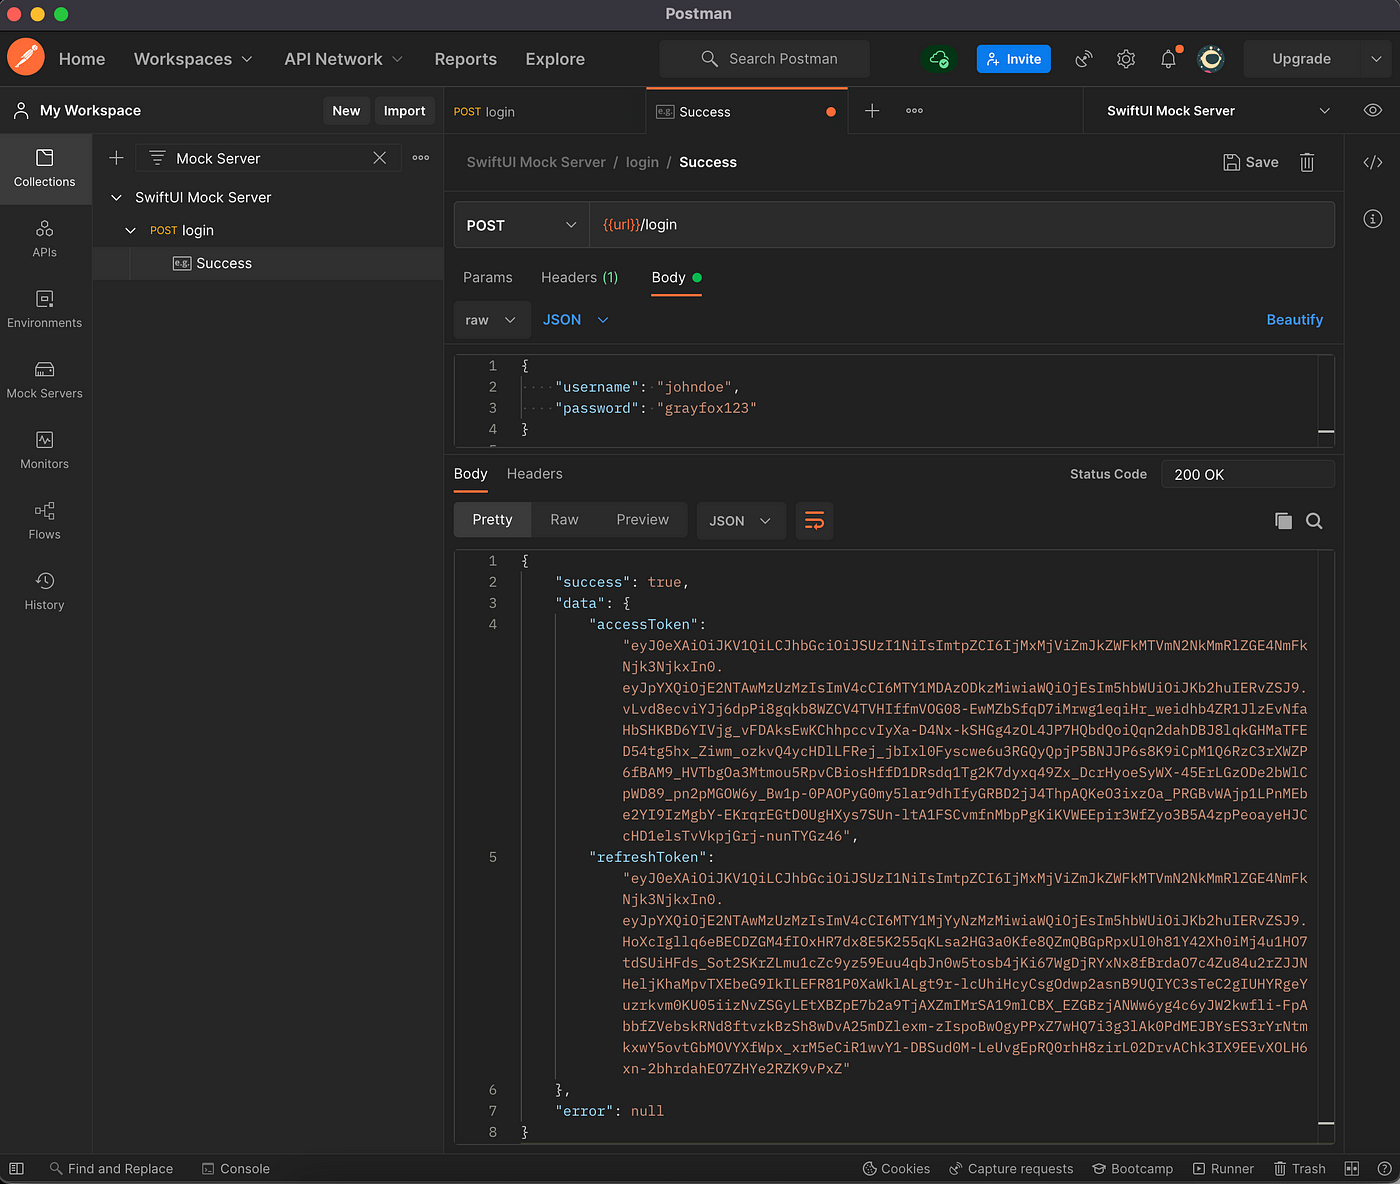
Next, let’s add this payload to the response body:
{
    "success": true,
    "data": {
        "accessToken": "eyJ0eXAiOiJKV1QiLCJhbGciOiJSUzI1NiIsImtpZCI6IjMxMjViZmJkZWFkMTVmN2NkMmRlZGE4NmFkNjk3NjkxIn0.eyJpYXQiOjE2NTAwMzUzMzIsImV4cCI6MTY1MDAzODkzMiwiaWQiOjEsIm5hbWUiOiJKb2huIERvZSJ9.vLvd8ecviYJj6dpPi8gqkb8WZCV4TVHIffmVOG08-EwMZbSfqD7iMrwg1eqiHr_weidhb4ZR1JlzEvNfaHbSHKBD6YIVjg_vFDAksEwKChhpccvIyXa-D4Nx-kSHGg4zOL4JP7HQbdQoiQqn2dahDBJ8lqkGHMaTFED54tg5hx_Ziwm_ozkvQ4ycHDlLFRej_jbIxl0Fyscwe6u3RGQyQpjP5BNJJP6s8K9iCpM1Q6RzC3rXWZP6fBAM9_HVTbgOa3Mtmou5RpvCBiosHffD1DRsdq1Tg2K7dyxq49Zx_DcrHyoeSyWX-45ErLGzODe2bWlCpWD89_pn2pMGOW6y_Bw1p-0PAOPyG0my5lar9dhIfyGRBD2jJ4ThpAQKeO3ixzOa_PRGBvWAjp1LPnMEbe2YI9IzMgbY-EKrqrEGtD0UgHXys7SUn-ltA1FSCvmfnMbpPgKiKVWEEpir3WfZyo3B5A4zpPeoayeHJCcHD1elsTvVkpjGrj-nunTYGz46",
        "refreshToken": "eyJ0eXAiOiJKV1QiLCJhbGciOiJSUzI1NiIsImtpZCI6IjMxMjViZmJkZWFkMTVmN2NkMmRlZGE4NmFkNjk3NjkxIn0.eyJpYXQiOjE2NTAwMzUzMzIsImV4cCI6MTY1MjYyNzMzMiwiaWQiOjEsIm5hbWUiOiJKb2huIERvZSJ9.HoXcIgllq6eBECDZGM4fIOxHR7dx8E5K255qKLsa2HG3a0Kfe8QZmQBGpRpxUl0h81Y42Xh0iMj4u1HO7tdSUiHFds_Sot2SKrZLmu1cZc9yz59Euu4qbJn0w5tosb4jKi67WgDjRYxNx8fBrdaO7c4Zu84u2rZJJNHeljKhaMpvTXEbeG9IkILEFR81P0XaWklALgt9r-lcUhiHcyCsgOdwp2asnB9UQIYC3sTeC2gIUHYRgeYuzrkvm0KU05iizNvZSGyLEtXBZpE7b2a9TjAXZmIMrSA19mlCBX_EZGBzjANWw6yg4c6yJW2kwfli-FpAbbfZVebskRNd8ftvzkBzSh8wDvA25mDZlexm-zIspoBwOgyPPxZ7wHQ7i3g3lAk0PdMEJBYsES3rYrNtmkxwY5ovtGbMOVYXfWpx_xrM5eCiR1wvY1-DBSud0M-LeUvgEpRQ0rhH8zirL02DrvAChk3IX9EEvXOLH6xn-2bhrdahEO7ZHYe2RZK9vPxZ"
    },
    "error": null
}
To be clear, our success response will return two JWT tokens that are used in the Bearer authorization: an access token and a refresh token. After you log in, you will use these tokens to authorize all of your API requests.
If you are curious how they are created, I just generated them using this handy Online JWT Generator tool. In a real-life scenario, though, they will be created and signed by your backend. And if you are even more curious and want to find out what information these tokens contain, just paste them into jwt.io and see!
This is how everything should look in the end, in Postman:
Our success case is officially done! 🎉
Don’t forget to click the Save button in the top right corner!
Now let’s create our failure example. It will reflect the case when a user enters an invalid username and password. We will create it the same way we did before. Let’s name our new example Invalid Credentials, and add the header Content-Type with the value application/json as usual.
The payload, however, in this case, will be:
{
    "username": "johndoe",
    "password": "bluedog123"
}
Now for the response. This is an error response, so let’s put 400 in the Status Code field.
We want to get an error message telling us that this particular username and password combination is wrong. Therefore, let’s put the following JSON in the response:
{
    "success": false,
    "data": null,
    "error": {
        "key": "Login.InvalidCredentials",
        "message": "Invalid username and password combination."
    }
}
This is the final result:
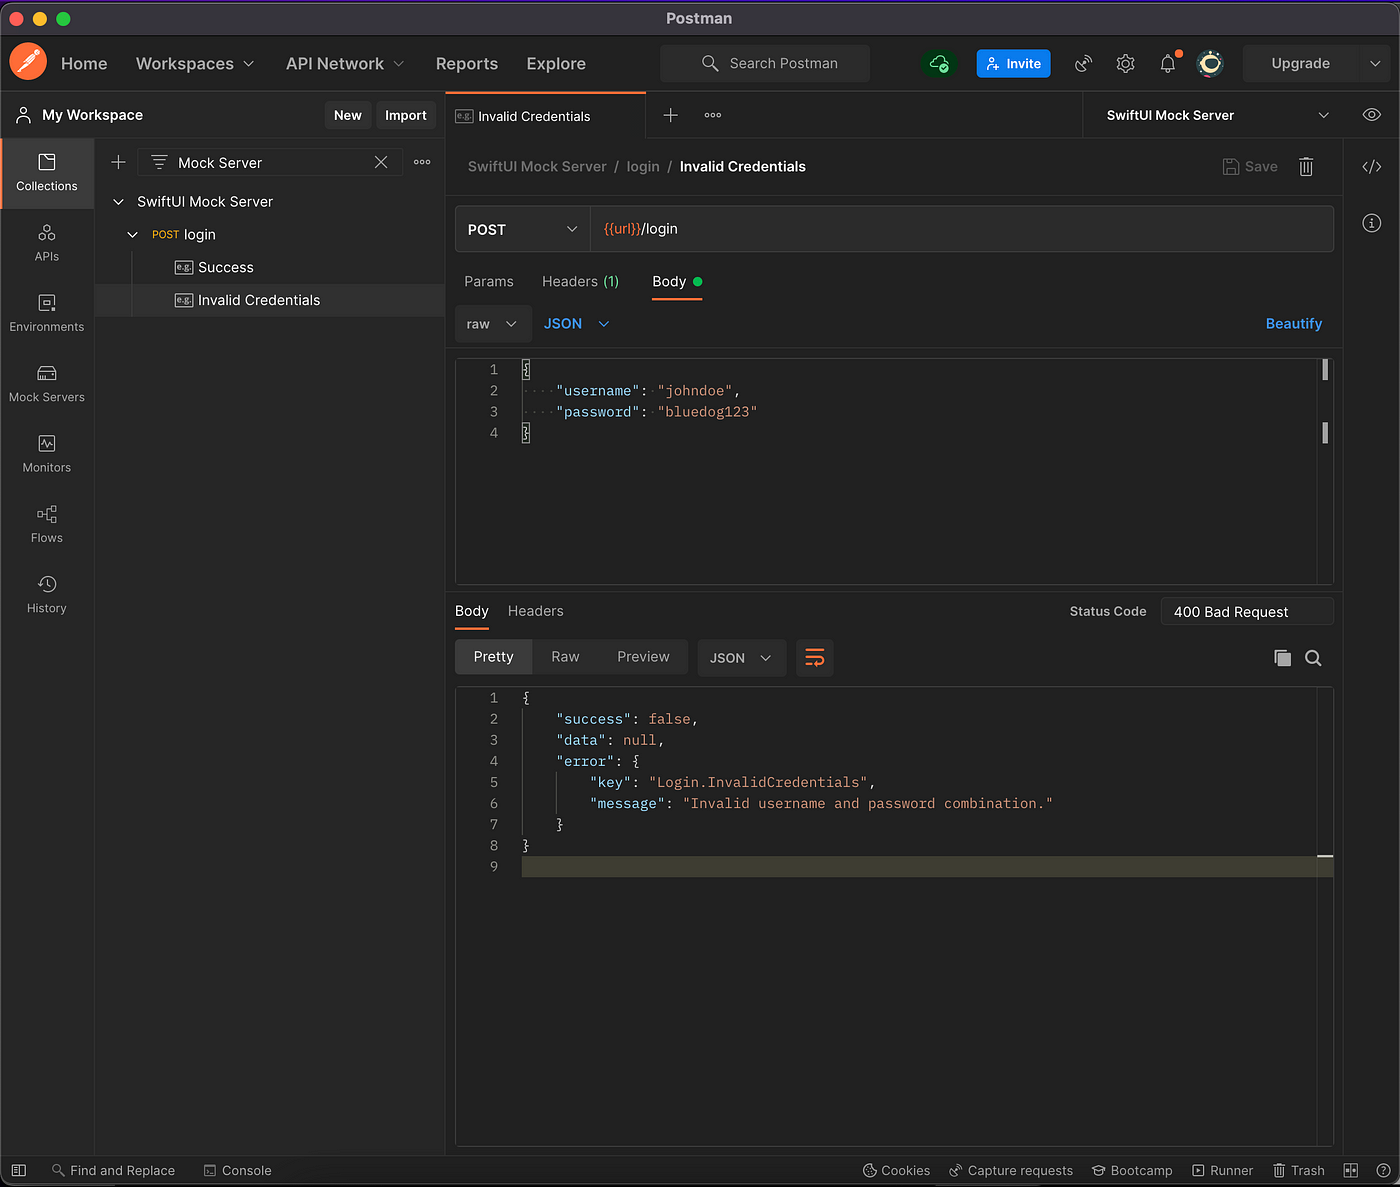
That wraps up our failure example! Time to test 🤩
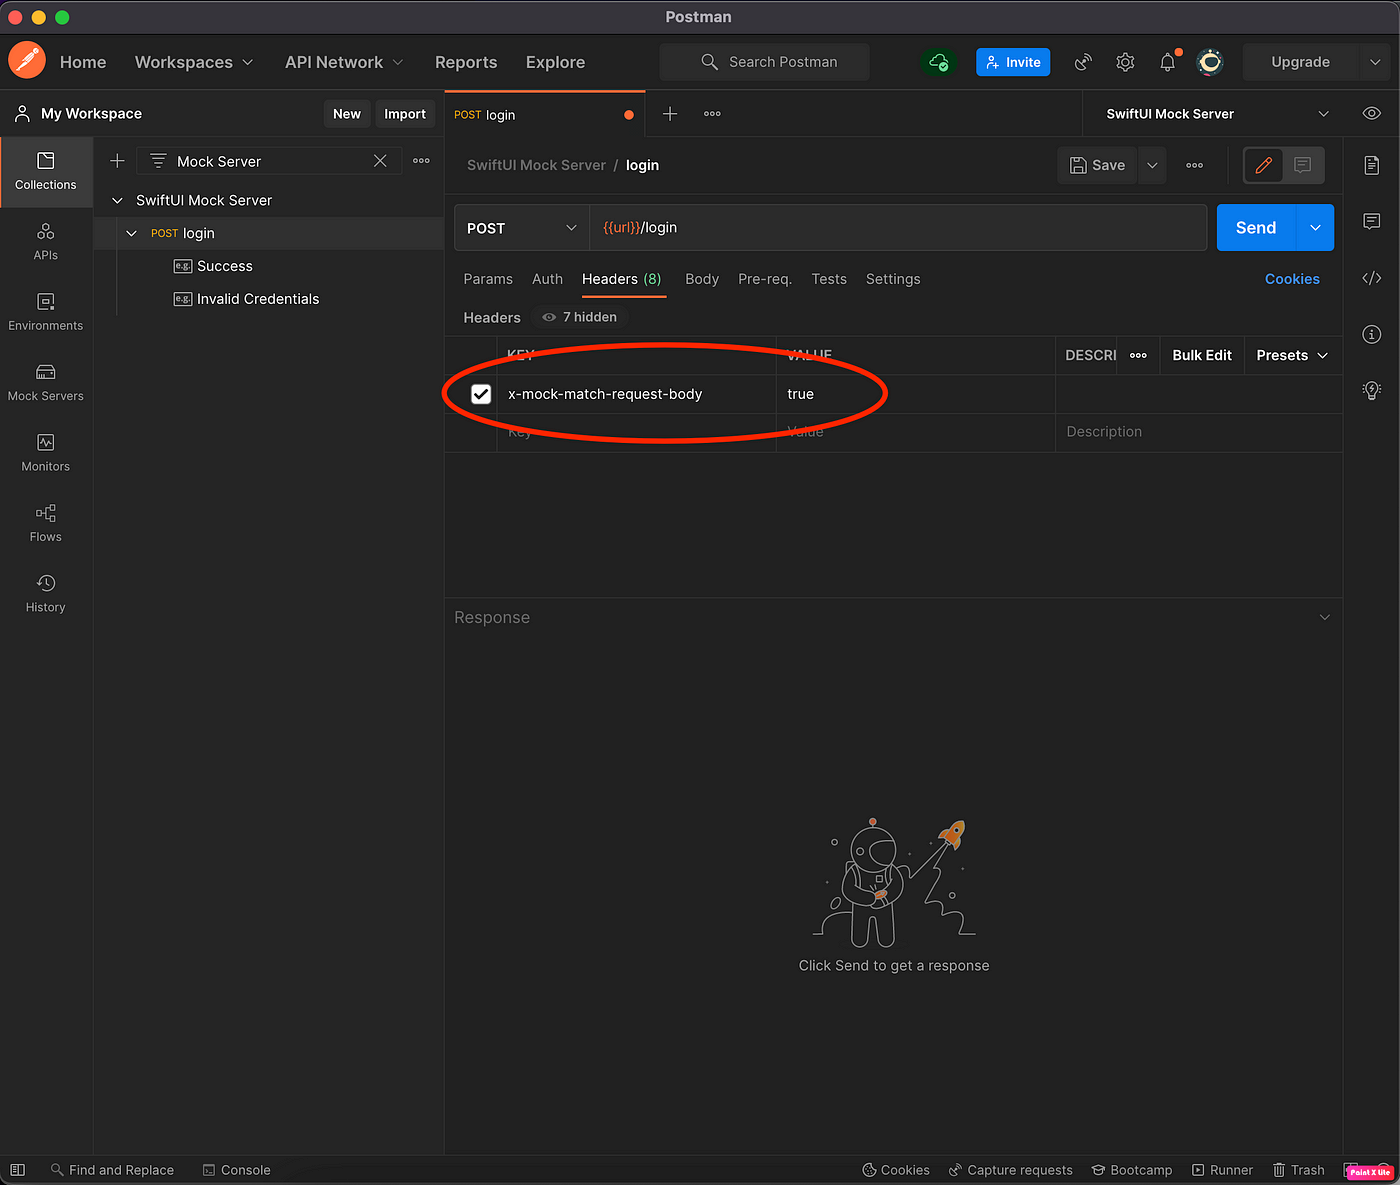
To test these two examples, click on the login request in the left pane, which is above our two newly created examples.
IMPORTANT: Because we are matching our examples based on the request body, you must include a special header x-mock-match-request-body with the value true in each one of your requests.
If you forget this header, you will experience some very strange behaviors while running your mock examples! More info on request headers can be found at this link.
Now, let’s enter our success request body and hit Send.
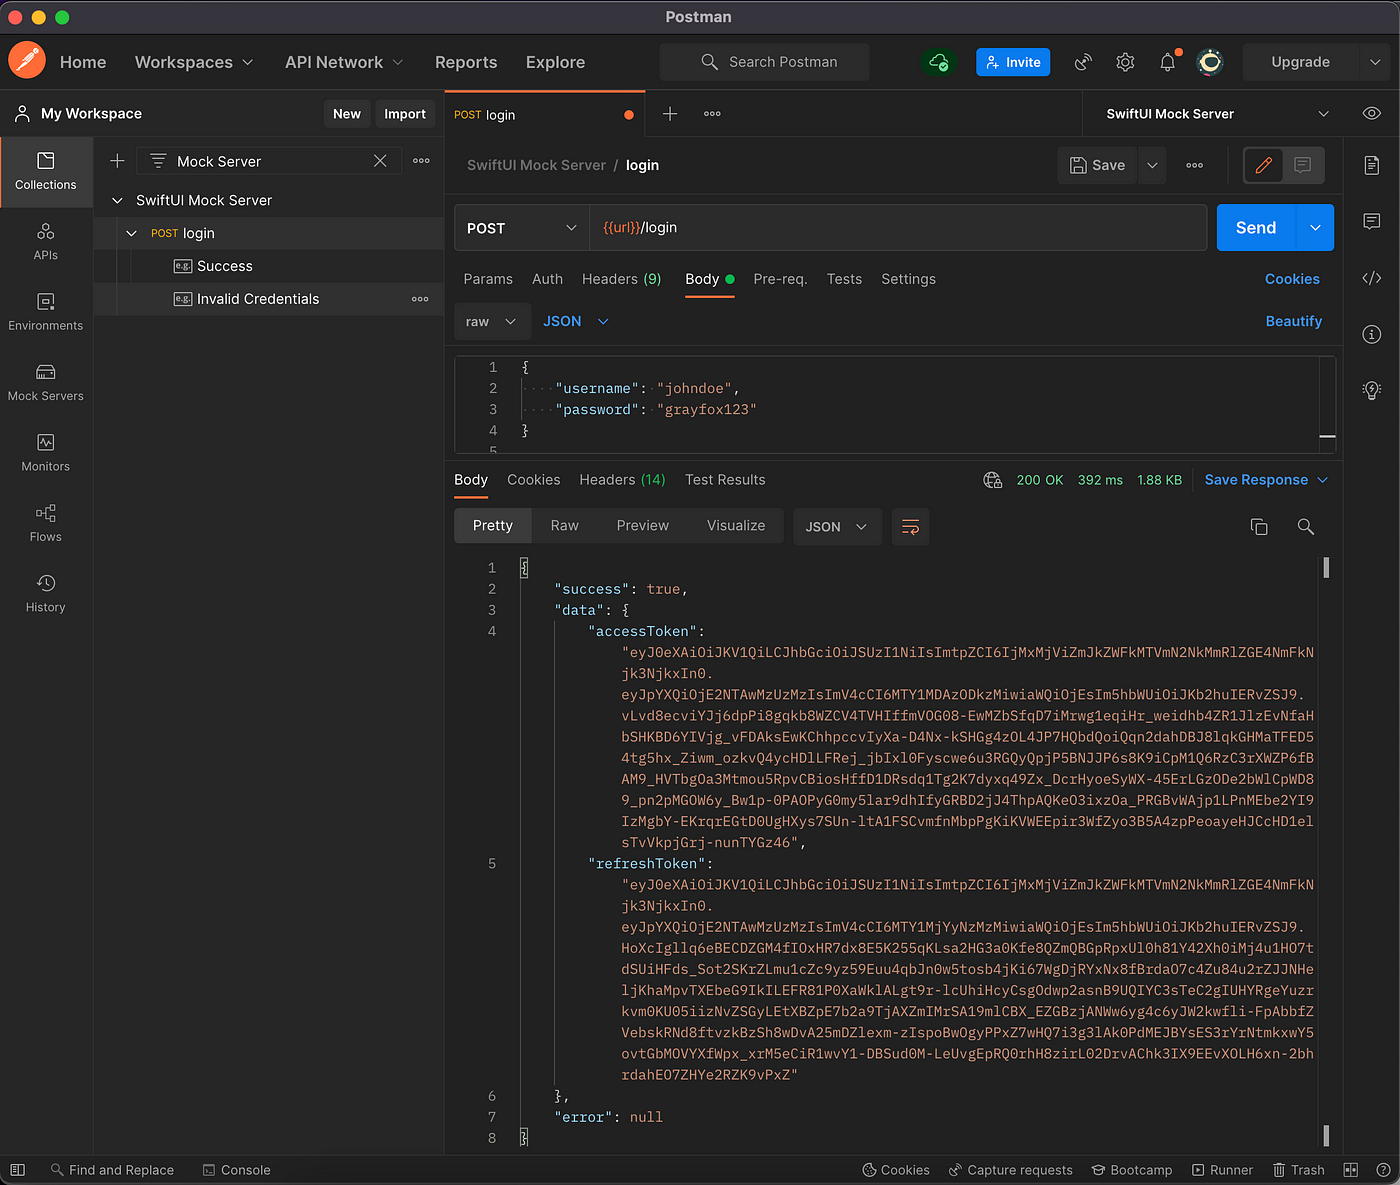
Voila! We got exactly what we expected in the response! 😆
Now let’s change the password to the “wrong” one and hit Send again.
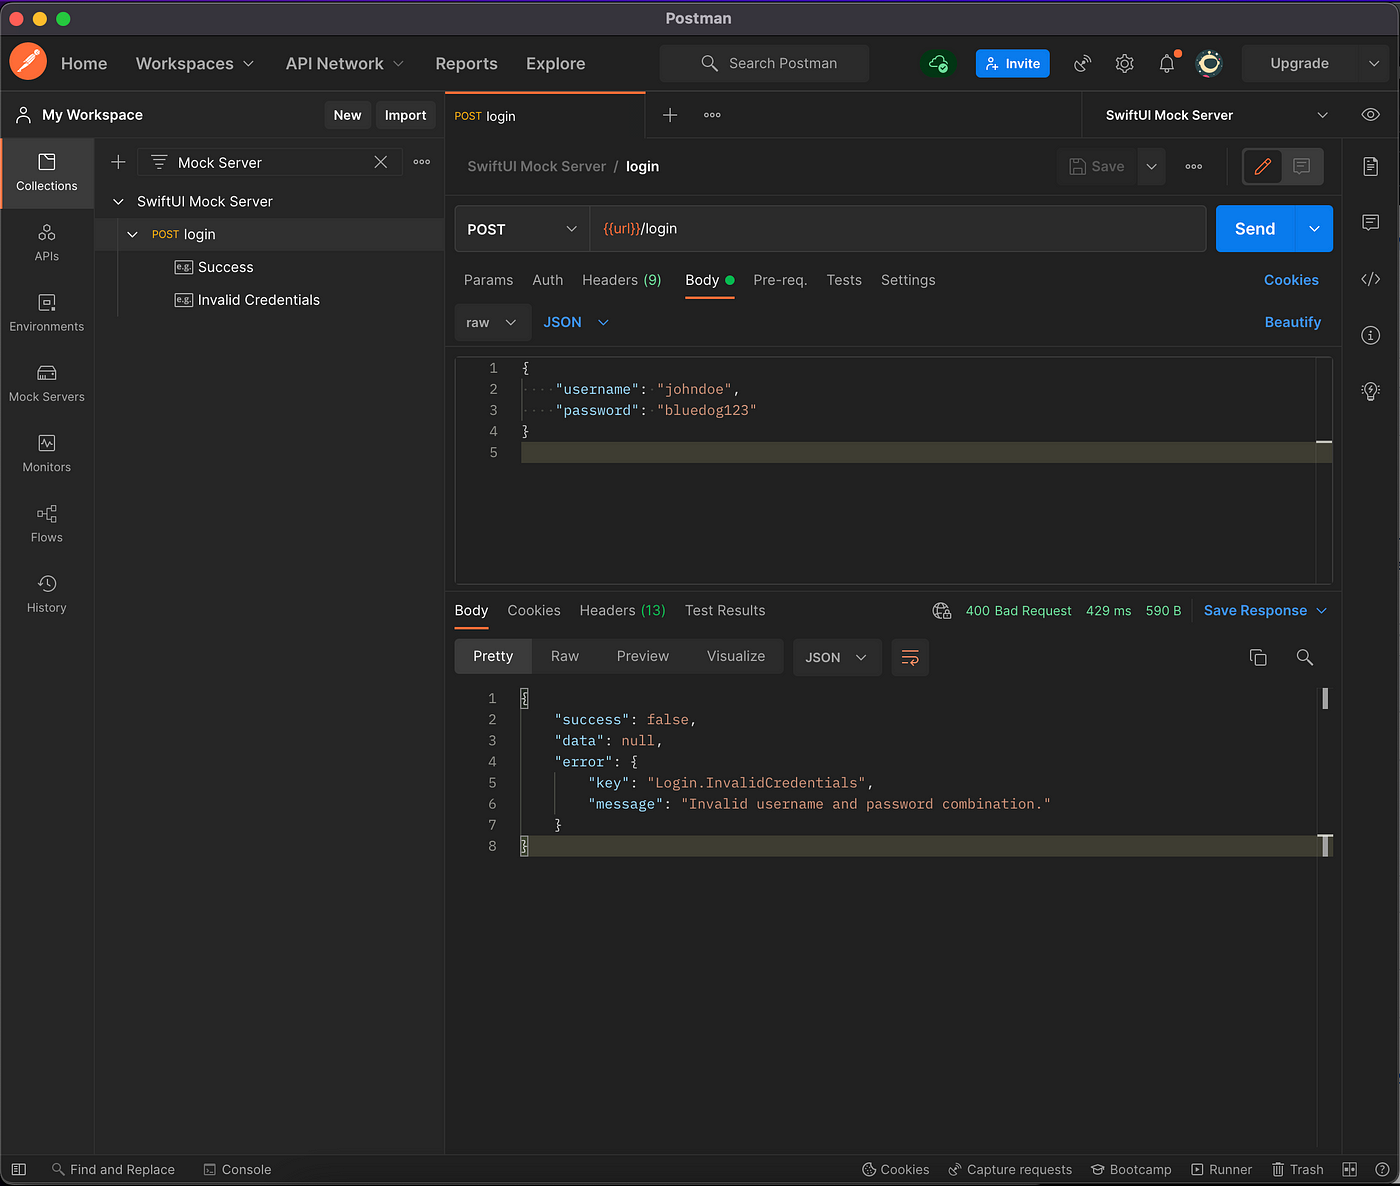
The request failed as expected, and we got the exact error response that we defined earlier! So even if the login action failed, it is a big success for us! 😊
Keep in mind that if you run a request that doesn’t match up with any of your prepared examples, you will get a “No matching requests” error. So, make sure to cover all the cases you want to test with appropriate examples!
Now that we have our success and failure API request examples up and running, let’s update our iOS app code so that it can test these requests.
First, we must set up the correct base URL. If you remember, earlier on, we hardcoded it to a dummy placeholder base_url. Now that we have a mock server, we need to put its base URL instead. To find out the base URL of your mock server, click on the “Environment quick look” eye icon right in the top right corner.
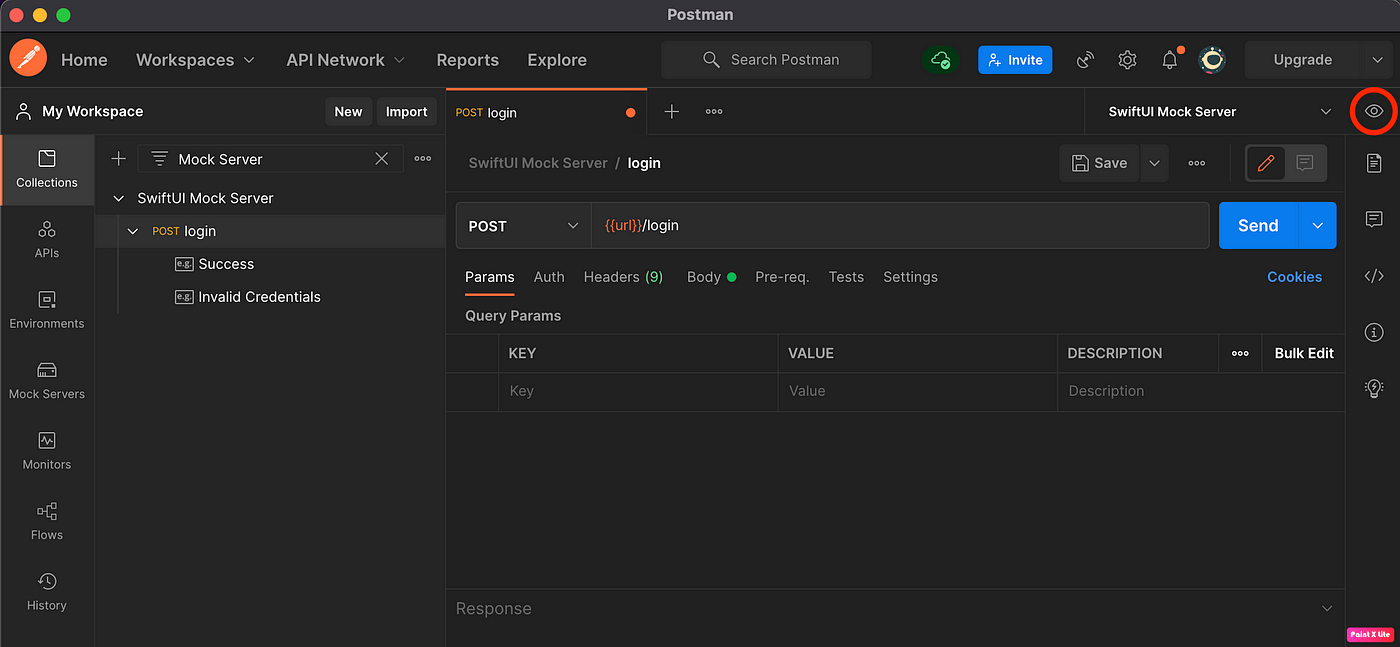
Next, copy the url stored in the Current value field (without the https:// part). Your base url will be different from the one shown in this screenshot.

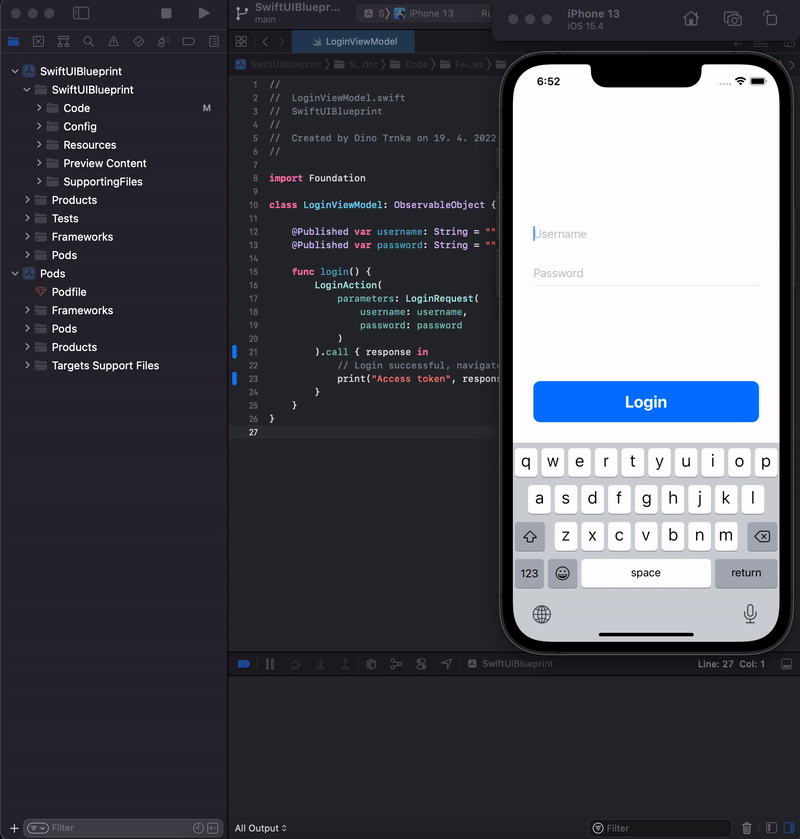
Now, let’s open up our LoginAction file.
import Foundation

struct LoginAction {

    var parameters: LoginRequest

    func call(completion: @escaping (LoginResponse) -> Void) {

        let scheme: String = "https"
        let host: String = "72a29288-615d-4ed4-8f9a-21b224056d7f.mock.pstmn.io" // Put your mock server url here
        let path = "/login"

        var components = URLComponents()
        components.scheme = scheme
        components.host = host
        components.path = path

        guard let url = components.url else {
            return
        }

        var request = URLRequest(url: url)
        request.httpMethod = "post"

        request.addValue("application/json", forHTTPHeaderField: "Content-Type")
        request.addValue("application/json", forHTTPHeaderField: "Accept")
        request.addValue("true", forHTTPHeaderField: "x-mock-match-request-body") // Add this request header

        . . .
We only need to update two things in this file. First, replace the old base_url value of your host variable with the mock server URL you copied from Postman.
Second, add a x-mock-match-request-body request header with the value true, just like we did in Postman earlier. Note that when you switch from the mock server to a real backend, you can remove this header.
Now let’s log the login response in our view model so we know the login request finished successfully. If everything goes as planned, we should see our access token in the console.
import Foundation

class LoginViewModel: ObservableObject {

    @Published var username: String = ""
    @Published var password: String = ""

    func login() {
        LoginAction(
            parameters: LoginRequest(
                username: username,
                password: password
            )
        ).call { response in
            // Login successful, navigate to the Home screen
            print("Access token", response.data.accessToken)
        }
    }
}
We will test our login flow with the successful credentials combination we defined in our Success mock example.
{
    "username": "johndoe",
    "password": "grayfox123"
}
Now let’s run the app and try it out!
Success! Our mock server received the API request and returned the expected response. Just as planned. 😏
Now we know how to simulate API requests, which is an incredibly useful skill to have. With this knowledge, you can define your own responses when you don’t have a production API ready. This can help you progress in your app development much faster and cover your app with all kinds of tests without having to wait for the backend to be ready and deployed.
In the continuation of this series, our SwiftUI app will be calling these two requests we just created, and it will receive the same JSON responses as we did here in Postman.
Great job on your progress so far, and see you in the next article! 😉
If you want to download a project that contains everything we’ve done so far, you can do it by clicking here.
“Build your first SwiftUI app” is part of a series of articles designed to help you get started with iOS app Development.
If you have any questions on any of the above-outlined thoughts, feel free to share them in the comment section.
Click here to read Part 1.: Project setup
Click here to read Part 2.: Project Architecture
Click here to read Part 3.: Create the Login screen
We have enabled communication with the API by creating a mock server with a login/ request example. But currently, we are only printing the access token to the console.
We want to navigate to the main screen of the app after a successful login and also stay logged in the next time we run the app. We will learn how to handle authorization and do all this in the next article!