
Congratulations! We have already implemented many essential components of our first SwiftUI app. In the previous part, we applied the necessary logic for our authorization. In our LoginAction class, we have everything we need to send an API request to our mock server.
Let’s think about scalability for a moment. If we wanted to create another API request, we would have to repeat most of the code we already wrote in our LoginAction. That’s not the kind of architecture we want to have.
According to the DRY (don’t repeat yourself) principle, we should not duplicate code, and we should strive to encapsulate as much common code as possible to make the development easier for ourselves and anyone else who might work on the project with us in the future.
This class should cover all the API use cases we might need. This means we also want to handle other types of requests besides GET. We want our class to be able to send POST, PUT, PATCH, and DELETE requests as well.
And that’s precisely what we will do now!
Basically, once we’re done with this helper class, it will be generic, meaning we won’t need to change it — or we will do it very rarely. Our Actions will use it instead by providing the necessary parameters to it and parsing the API responses from it.
Time for action! 😁
Let’s create a new singleton class in our Utilities folder. We will call it APIRequest.
We will start shaping our helper class by moving the relevant code from our LoginAction to APIRequest. It will look like this:
import Foundation

typealias CompletionHandler = (Data) -> Void

enum HTTPMethod: String {
    case get
    case put
    case delete
    case post
}

class APIRequest<Parameters: Encodable, Model: Decodable> {

    static func call(
        path: String,
        method: HTTPMethod,
        parameters: Parameters? = nil,
        completion: @escaping CompletionHandler
    ) {

        let scheme: String = "https"
        let host: String = "72a29288-615d-4ed4-8f9a-21b224056d7f.mock.pstmn.io" // Put your mock server url here

        var components = URLComponents()
        components.scheme = scheme
        components.host = host
        components.path = path

        guard let url = components.url else {
            return
        }

        var request = URLRequest(url: url)
        request.httpMethod = method.rawValue

        request.addValue("application/json", forHTTPHeaderField: "Content-Type")
        request.addValue("application/json", forHTTPHeaderField: "Accept")
        request.addValue("true", forHTTPHeaderField: "x-mock-match-request-body")

        if let parameters = parameters {
            request.httpBody = try? JSONEncoder().encode(parameters)
        }

        let task = URLSession.shared.dataTask(with: request) { data, _, error in
            if let data = data {
                completion(data)
            } else {
                if let error = error {
                    print("Error: \(error.localizedDescription)")
                }
            }
        }
        task.resume()
    }
}
So far, so good! Now let’s modify our LoginAction to use the newly created APIRequest class:
import Foundation

struct LoginAction {
    let path = "/login"
    let method: HTTPMethod = .post
    var parameters: LoginRequest

    func call(
        completion: @escaping (LoginResponse) -> Void
    ) {
        APIRequest<LoginRequest, LoginResponse>.call(
            path: path,
            method: .post,
            parameters: parameters
        ) { data in
            if let response = try? JSONDecoder().decode(
                LoginResponse.self,
                from: data
            ) {
                completion(response)
            } else {
                print("Unable to decode response JSON")
            }
        }
    }
}
Great! Now our LoginAction only contains the logic that is specific to, well, the login action. 😃 All the generic API-handling code is moved to the APIRequest class, which can stay unmodified and be useful to us whenever we need to send an API request. And we have support for all sorts of API requests, and not just for theGET request.
With this setup in place, if we need to make a new request, we can simply instantiate a new APIRequest and fill it with parameters specific to that particular API call.
This is a significant first step. But our APIRequest class is not powerful enough yet. We can extend it further to really make it shine.
First and foremost, our scheme and host variables don’t belong in the APIRequest class. These variables should reside in a separate configurational file. So, let’s create a new file in our Utilities folder, and name it Config:
class Config {
    static let shared = Config()

    let scheme: String = "https"
    let host: String = "72a29288-615d-4ed4-8f9a-21b224056d7f.mock.pstmn.io" // Put your mock server url here
}
Next, we’ll modify the APIRequest class accordingly:
...

class APIRequest<Parameters: Encodable, Model: Decodable> {

    static func call(
        scheme: String = Config.shared.scheme,
        host: String = Config.shared.host,
        path: String,
        method: HTTPMethod,
        parameters: Parameters? = nil,
        completion: @escaping CompletionHandler
    ) {
        var components = URLComponents()
        components.scheme = scheme
        components.host = host
        components.path = path

...
You can see that we are keeping things flexible by allowing passing scheme and host variables as parameters. Still, they are set to our hardcoded variables in the Config file by default so that we can omit them from our calls.
Our API handler can handle the success cases, but what about failures? Currently, we are just printing the error message in the APIRequest class, and that’s not a good way to deal with failures. Let’s improve this now.
We could use Apple’s Error class for our error-handling purposes, but we’ll benefit more from creating our own class (that implements the regular Error class). In the Utilities folder, create a new enum and call it APIError.
At this point, it will be straightforward and contain only two error cases:
enum APIError: String, Error {
    case jsonDecoding
    case response
}
Now, let’s integrate failure cases in our APIRequest class. I marked the added lines of code with comments, so you can spot what was added.
import Foundation

typealias CompletionHandler = (Data) -> Void
typealias FailureHandler = (APIError) -> Void // Added this

enum HTTPMethod: String {
    case get
    case put
    case delete
    case post
}

class APIRequest<Parameters: Encodable, Model: Decodable> {

    static func call(
        scheme: String = Config.shared.scheme,
        host: String = Config.shared.host,
        path: String,
        method: HTTPMethod,
        parameters: Parameters? = nil,
        completion: @escaping CompletionHandler,
        failure: @escaping FailureHandler // Added this
    ) {
        var components = URLComponents()
        components.scheme = scheme
        components.host = host
        components.path = path

        guard let url = components.url else {
            return
        }

        var request = URLRequest(url: url)
        request.httpMethod = method.rawValue

        request.addValue("application/json", forHTTPHeaderField: "Content-Type")
        request.addValue("application/json", forHTTPHeaderField: "Accept")
        request.addValue("true", forHTTPHeaderField: "x-mock-match-request-body")

        if let parameters = parameters {
            request.httpBody = try? JSONEncoder().encode(parameters)
        }

        let task = URLSession.shared.dataTask(with: request) { data, _, error in
            if let data = data {
                completion(data)
            } else {
                if error != nil {
                    failure(APIError.response) // Added this
                }
            }
        }
        task.resume()
    }
}
Of course, now we need to integrate our custom errors in the LoginAction class too:
import Foundation

struct LoginAction {
    let path = "/login"
    let method: HTTPMethod = .post
    var parameters: LoginRequest

    func call(
        completion: @escaping (LoginResponse) -> Void,
        failure: @escaping (APIError) -> Void // Added this
    ) {
        APIRequest<LoginRequest, LoginResponse>.call(
            path: path,
            method: .post,
            parameters: parameters
        ) { data in
            if let response = try? JSONDecoder().decode(
                LoginResponse.self,
                from: data
            ) {
                completion(response)
            } else {
                failure(.jsonDecoding) // Added this
            }
        } failure: { error in
            failure(error) // Added this
        }
    }
}
Almost there! Let’s correct our LoginViewModel now by adding a failure block and a variable that will hold our errors.
import Foundation

class LoginViewModel: ObservableObject {

    @Published var username: String = ""
    @Published var password: String = ""

    @Published var error: APIError? // Added this

    func login() {
        LoginAction(
            parameters: LoginRequest(
                username: username,
                password: password
            )
        ).call { response in
            self.error = nil // Added this

            Auth.shared.setCredentials(
                accessToken: response.data.accessToken,
                refreshToken: response.data.refreshToken
            )
        } failure: { error in
            self.error = error // Added this
        }
    }
}
Finally, we need to show an error label to the user if the login action fails.
This requires adding a small code snippet to the LoginScreen that displays an error label if the value of the error variable from the view model is set.
import SwiftUI

struct LoginScreen: View {

    @ObservedObject var viewModel: LoginViewModel = LoginViewModel()

    var body: some View {
        VStack {

            Spacer()

            VStack {
                TextField(
                    "Login.UsernameField.Title".localized,
                    text: $viewModel.username
                )
                .autocapitalization(.none)
                .disableAutocorrection(true)
                .padding(.top, 20)

                Divider()

                SecureField(
                    "Login.PasswordField.Title".localized,
                    text: $viewModel.password
                )
                .padding(.top, 20)

                Divider()
            }

            Spacer()

            if viewModel.error != nil { // Added this
                Text("Login error")
                    .fontWeight(.bold)
                    .foregroundColor(.red)
            }

            Spacer()

            Button(
                action: viewModel.login,
                label: {
                    Text("Login.LoginButton.Title".localized)
                        .modifier(MainButton())
                }
            )
        }
        .padding(30)
    }
}

struct LoginScreen_Previews: PreviewProvider {
    static var previews: some View {
        LoginScreen()
    }
}
And that’s it! We didn’t change a lot of code, yet we implemented a solid base logic for error handling in our app. Now you can extend the APIError class with your own custom cases to signal all potential error use cases in your app in a granular, precise way.
Our helper class is pretty powerful at this point! However, we can add a couple more things to our APIRequest to improve it further.
Let’s start by implementing network availability detection. We need to create a new class in the Utilities folder called NetworkMonitor.
import Foundation
import Network

class NetworkMonitor {

    static let shared: NetworkMonitor = NetworkMonitor()

    let monitor = NWPathMonitor()
    private var status: NWPath.Status = .requiresConnection
    var isReachable: Bool { status == .satisfied }

    func startMonitoring() {
        monitor.pathUpdateHandler = { path in
            self.status = path.status
        }

        let queue = DispatchQueue(label: "Monitor")
        monitor.start(queue: queue)
    }

    func stopMonitoring() {
        monitor.cancel()
    }

}
This simple helper class will monitor the network status and put the result in the isReachable boolean variable. To make it work, we need to call its startMonitoring() method as soon as possible.
Therefore, the best place to put this call is in the init() method of the App class of the project. We need to modify our SwiftUIBlueprintApp, so it looks like this:
import SwiftUI

@main
struct SwiftUIBlueprintApp: App {

    init() {
        NetworkMonitor.shared.startMonitoring() // Added this
    }

    var body: some Scene {
        WindowGroup {
            ContentView()
        }
    }
}
Great! Now, let’s add our new error case in the APIError we created earlier:
import Foundation

enum APIError: String, Error {
    case jsonDecoding
    case response
    case noInternet // Added this
}
Finally, all there is left to do is to call isReachable() method from the APIRequest class:
...

    static func call(
        scheme: String = Config.shared.scheme,
        host: String = Config.shared.host,
        path: String,
        method: HTTPMethod,
        parameters: Parameters? = nil,
        completion: @escaping CompletionHandler,
        failure: @escaping FailureHandler
    ) {
        if !NetworkMonitor.shared.isReachable { // Added this
            return failure(.noInternet)
        }

        var components = URLComponents()
        components.scheme = scheme
        components.host = host
        components.path = path

...
API helper is equipped to handle network connectivity! If you want to test this, you can write something like this in the LoginScreen file:
...

if viewModel.error == .noInternet {
    Text("No internet")
        .fontWeight(.bold)
        .foregroundColor(.red)
} else if viewModel.error != nil {
    Text("Login error")
        .fontWeight(.bold)
        .foregroundColor(.red)
}

...
Of course, it’s better to create a ViewModifier to encapsulate these two lines of styling code that are duplicated here, but I’ll leave that to you 😉
If you followed everything we’ve done so far and then tried to login without internet connection, your login screen should look like this:
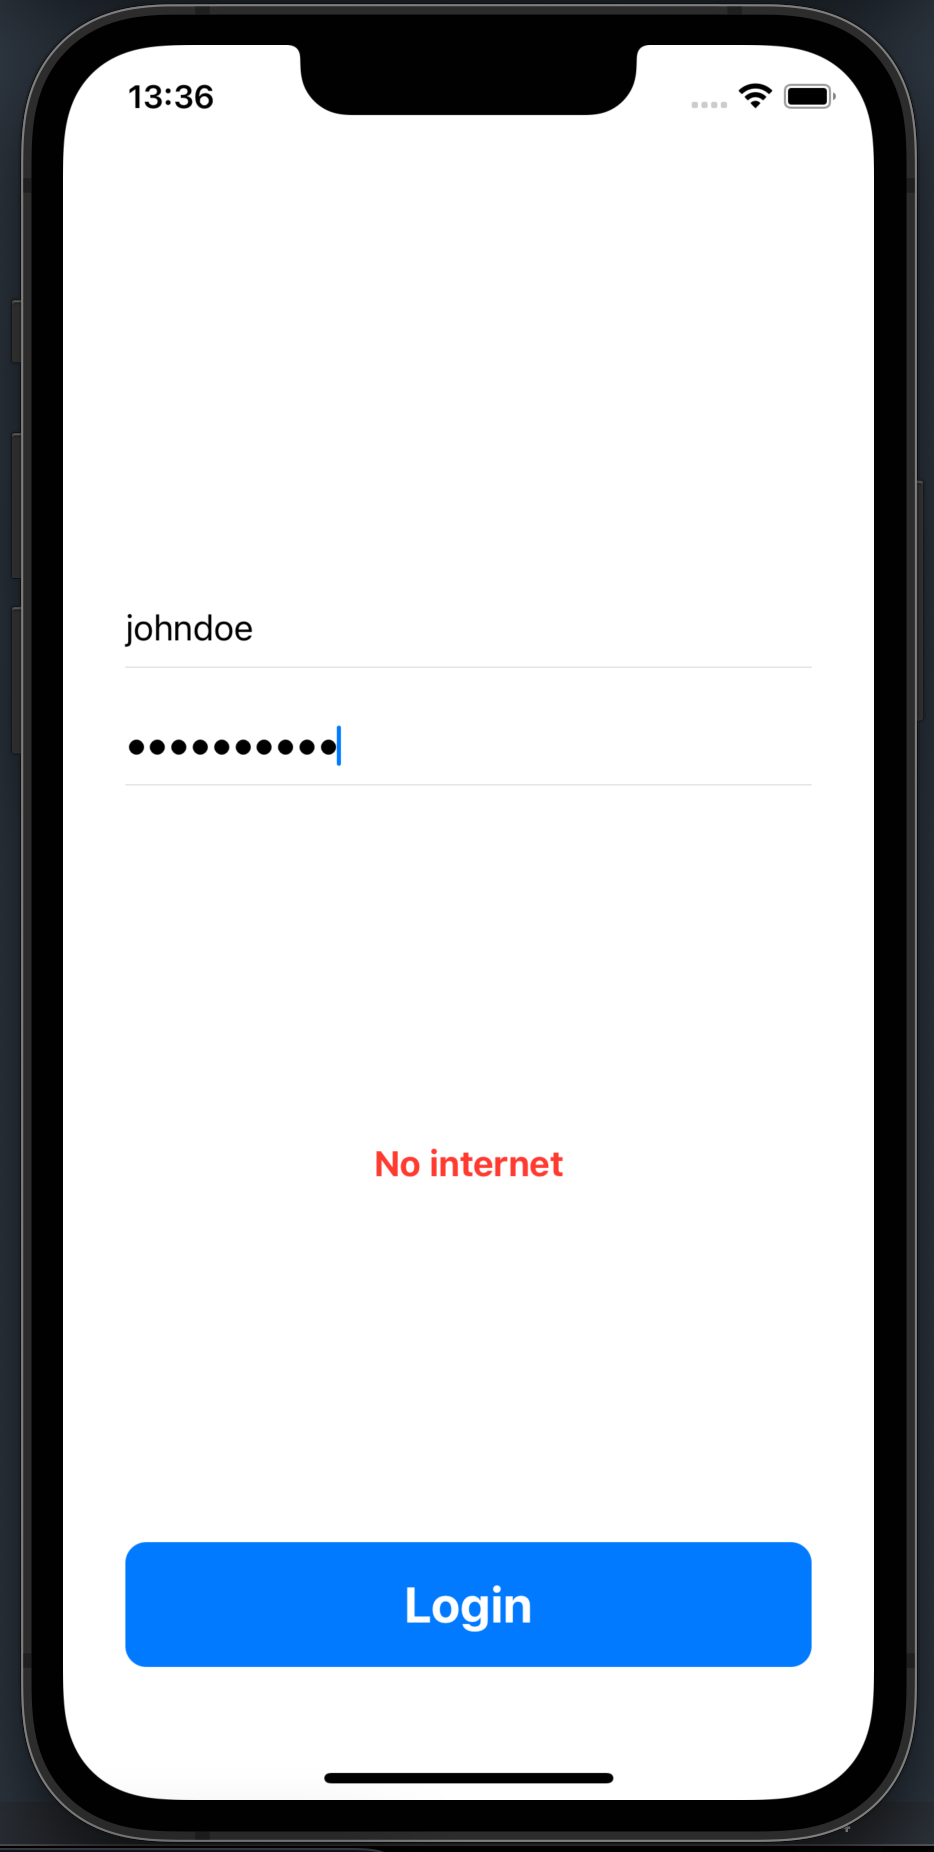
NOTE: When you test internet connectivity, do not use the simulator, as it behaves inconsistently, and you won’t be able to test it properly. Use an actual iOS device instead.
Network detection is done! Let’s add a few more handy features to our APIRequest class and wrap it up.
As our project gets bigger, we might encounter use cases where the API doesn’t take any parameters or doesn’t produce any response. Our API helper class must be able to handle these scenarios. Also, we need support for query items that might be required in API calls (usually GET request parameters). Finally, we need to distinguish between authorized and non-authorized calls so we can add our Bearer token as a header in all authorized requests.
Here’s how we can easily extend our APIRequest to support all these functionalities (as usual, added lines of code are marked in the comments):
import Foundation

typealias CompletionHandler = (Data) -> Void
typealias FailureHandler = (APIError) -> Void

struct EmptyRequest: Encodable {} // Added this
struct EmptyResponse: Decodable {} // Added this

enum HTTPMethod: String {
    case get
    case put
    case delete
    case post
}

class APIRequest<Parameters: Encodable, Model: Decodable> {

    static func call(
        scheme: String = Config.shared.scheme,
        host: String = Config.shared.host,
        path: String,
        method: HTTPMethod,
        authorized: Bool,                  // Added this
        queryItems: [URLQueryItem]? = nil, // Added this
        parameters: Parameters? = nil,
        completion: @escaping CompletionHandler,
        failure: @escaping FailureHandler
    ) {
        if !NetworkMonitor.shared.isReachable {
            return failure(.noInternet)
        }

        var components = URLComponents()
        components.scheme = scheme
        components.host = host
        components.path = path

        if let queryItems = queryItems { // Added this
            components.queryItems = queryItems
        }

        guard let url = components.url else {
            return
        }

        var request = URLRequest(url: url)
        request.httpMethod = method.rawValue

        request.addValue("application/json", forHTTPHeaderField: "Content-Type")
        request.addValue("application/json", forHTTPHeaderField: "Accept")
        request.addValue("true", forHTTPHeaderField: "x-mock-match-request-body")

        if let parameters = parameters {
            request.httpBody = try? JSONEncoder().encode(parameters)
        }

        if authorized, let token = Auth.shared.getAccessToken() { // Added this
            request.addValue("Bearer \(token)", forHTTPHeaderField: "Authorization")
        }

        let task = URLSession.shared.dataTask(with: request) { data, _, error in
            if let data = data {
                completion(data)
            } else {
                if error != nil {
                    failure(APIError.response)
                }
            }
        }
        task.resume()
    }
}
That’s it! We’ve got a fully functional APIRequest helper class that we can use for all sorts of requests! If we want to support more features in the future, we can extend this class, but our API helper is now more than capable of handling all our needs. Now, when we want to implement a new action, we can make a new instance of APIRequest and provide the necessary parameters and completion handlers.
No duplicate code! Scalability all the way 😉
If you want to download a project that contains everything we’ve done so far, you can do it by clicking here.
“Build your first SwiftUI app” is part of a series of articles designed to help you get started with iOS app Development.
If you have any questions on any of the above-outlined thoughts, feel free to share them in the comment section.
Click here to read Part 1.: Project setup
Click here to read Part 2.: Project Architecture
Click here to read Part 3.: Create the Login screen
Click here to read Part 4.: Set up a mock server with Postman
Click here to read Part 5.: Handling authorization
We’ve created a solid blueprint for our SwiftUI apps! However, we still don’t know how to send our apps to the AppStore so the world can enjoy our magnificent work. In the next article, we will learn what is needed to upload our app to the AppStore and how to do it. Exciting times are ahead! 🤩